During the winter season, there are many ways to heat your tent. You can either buy heating gear or go for a DIY option.
If you are running on a budget, a DIY candle tent heater is a great and reliable alternative that will keep your tent warm during winter days. There are many ways to make a DIY candle tent heater, and we created a simple step-by-step guide to help you build it.
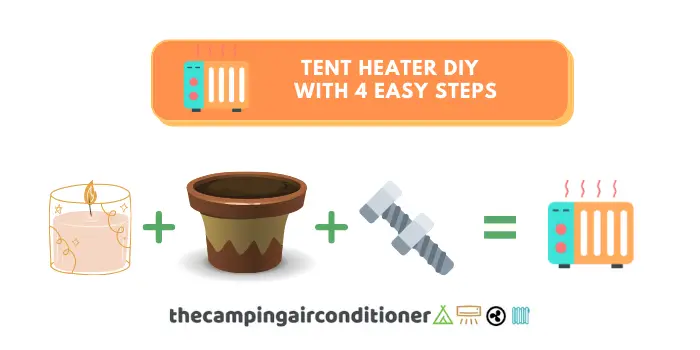
Tent Heater DIY - Summary
Here are the four steps you need to make a DIY candle tent heater (see the detailed step-by-step below):
Step 1: Assemble the clay pot structure
Step 2: Thread the bolt through the bracket and make a handle
Step 3: Create a base using bricks, cement blocks, or glass pans
Step 4: Light the Candle – Surround the candles with three mason jars or non-inflammable items
Before going through our detailed guide to make your candle tent heater, let’s understand how it works.
How does a DIY Candle tent heater work?
A candle heater is a device that enhances scent distribution throughout a room or space without using an open flame. Generally, it is an economical and improvised cold weather survivalism solution loved by campers and outdoor lovers.
So, how does a candle that uses so little flame produce noticeable heat for an ample space? The secret is how the heat from the candles is absorbed into the pots and transferred evenly to the room. First, the candles heat the air in the pot, trapping the warmth inside.
Then, if you opt for a double-pot setup, the warm air trapped inside warms up the pot plus the bolt on the inside. It works as a heat battery, keeping the warm energy and radiating the heat closer to the ground instead of letting it float up to the ceiling.
Candle DIY Tent Heater - detailed step-by-step
Below, we detail the required materials and steps you need to build this tent heater.
Candle Heater - What material do you need?
To build your candle tent heater, you won’t require many materials. You will need the following materials:
2 different sized clay planting pots (if you opt to use two pots, one pot should be smaller than the other so it can rest inside the larger pot)
Cement blocks, bricks, glass pans, or muffin tin to act as a steady base.
1 large bolt, washers, or bolts (approximately 5-inches) if you choose the two-pot method
So, let’s build this candle tent heater.
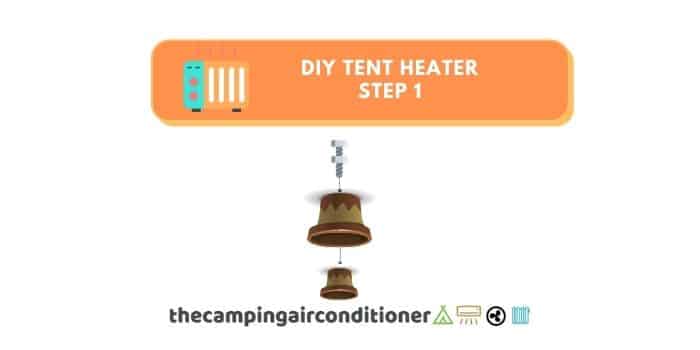
Step 1 - Thread the bolt through the bracket and make a handle
First, you need to assemble the heater structure. The required items include the small pot, screw rod, toggle bolt, round washer, and square washer.
Start by drilling a hole in the bottom of the pot and inserting a round washer, followed by a square washer. Considering the double-pot setup, push the screw rod inside the clay pot. On the outside of the pot, attach the toggle bolt.
There is another washer to be added to the screw in the opposite direction (inside the bigger pot – see picture below). Next, insert the smaller pot inside the big pot, creating the double-pot structure (use washers to fix both pots).
If you notice a gap around the holes, make sure that you fill them with modelling clay or any other insulating material. This will increase the efficiency of your heater.
Note: do not tighten it too hard because you can break the pot.
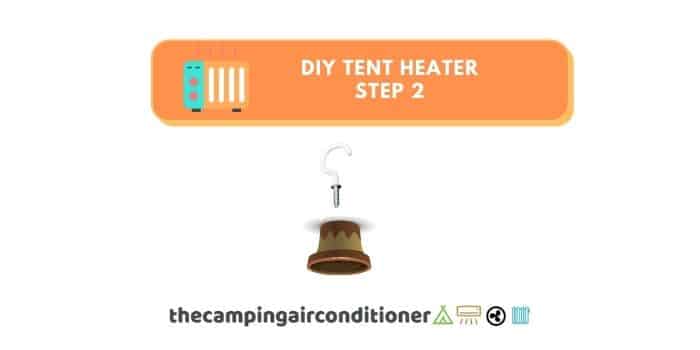
Step 2 - Making a handle with a plant hook.
After setting up the pots, top it off using a plant hook. The hook should be well tightened to the structure and stiff since it will serve as a handle. All you need is to drill a second pilot hole in the pot and screw in the eye hook.
If possible, make sure that the hook has some sort of insulation to avoid overheating and burns (a vinyl-coated option might be a good idea). Now, you are ready to move your heater structure around without much hassle!
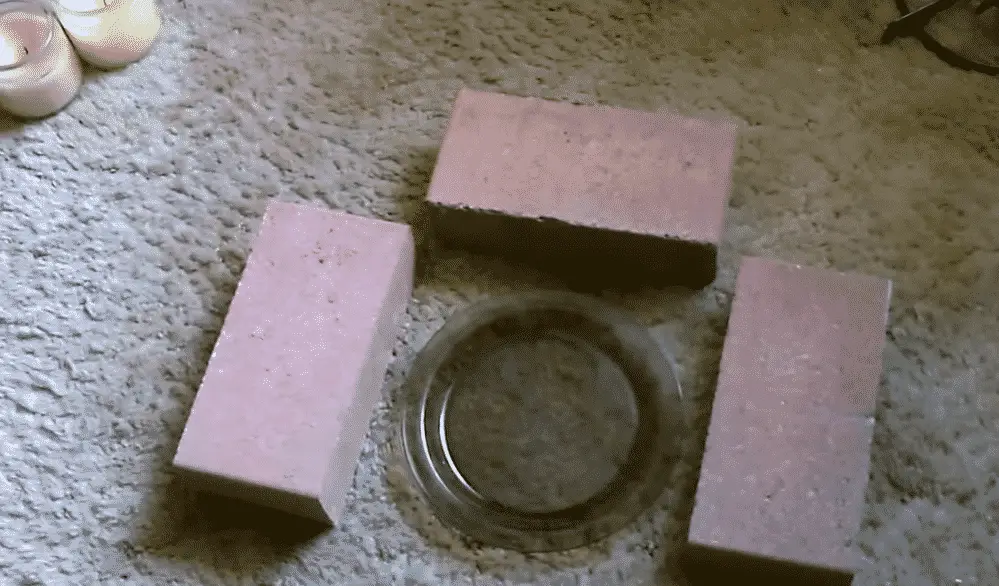
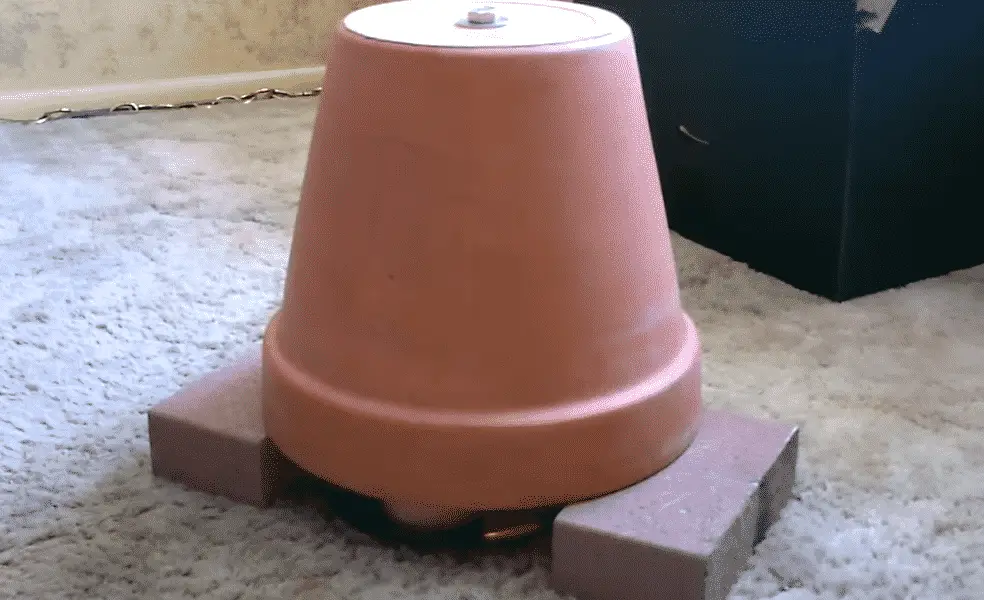
Step 3 - Create a base using bricks, cement blocks, or glass pans
Next, you will need to install cement blocks, glass pans, or bricks to heighten the pot above the candles and leave air intake and circulation gaps. A clay plate in the middle will create a safe surface for the candle to burn efficiently.
You should allow more than enough space in the front to insert and remove the candle when the need arises. In addition, you can add another brick or cement block in the front to contain the heat while the candle is lit. Other than allowing circulation, the blocks on the base provide a reliable and sturdy base for the candle tent heater.
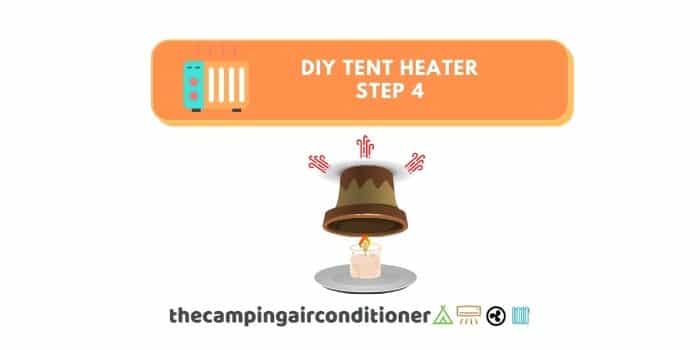
Step 4 - Light the Candle and enjoy the heat!
You can now light them up after you are done with the setup and create a good elevation for the candles. You can surround the candles with large bricks, cement blocks, mason jars, or other fire-resistant items that will act as the stand to keep the pots in position.
Ensure the pots are upside down, and there should be no leak where heat can escape through, and… You are done!
Before the heater feels warm to the touch, it will take a few minutes. The inner pot heats first and retains heat before distributing it to the outer pot.
A single candle will heat up well, but it will be better if you get a glass jar candle with two or three wicks. You also have to be very careful because any mistake can lead to a fire.
Ensure that the materials are non-flammable (except for the candles) and placed on a fire-resistant surface.
DIY Heater - Step-by-step video (similar approach)
This YouTube video shows a similar step-by-step approach.
FAQ
Is it safe to use this DIY tent heater in a tent?
Yes, using a DIY candle heater in a tent is safe. You only have to ensure that you have placed the base on a non-flammable surface to prevent a fire.
Furthermore, all the other materials should be fire-resistant and safe to use. If you decide to use 3 candles, expect each candle to heat a small tent about 2-degrees or 4-degrees F.
Make sure your tent is well ventilated to allow some heat to escape and prevent poisoning and overheating.
Are there risks involved when using a DIY candle heater in a tent?
Generally, there are many risks involved if you don’t observe the safety measures required. First, it can lead to a fire if left unattended for long.
Hence, you must keep an eye on it whether you are using it in a tent or at home. Make sure you place it over a non-combustible surface and avoid placing it over or near carpet, magazines, walls, or flammable materials.
The other problem you can encounter is carbon monoxide poisoning. If the candle heater is enclosed in a small tent with no ventilation, you are at risk of carbon monoxide poisoning (with candle heaters, this risk is minimal though). So, make sure your tent is well ventilated and use a carbon monoxide detector.
The candle heater is an efficient alternative. Referring to this video on YouTube, the heater reaches a maximum of 165-degrees F. The heat produced is more than enough to keep your tent cozy, mainly if you love winter camping.
Furthermore, the pots retain the heat for long, offering warmth even after the candles go off.
How long can the candles last?
The longevity of the candles will depend on their size and how well your tent is ventilated. The more ventilated your tent is, the faster and evenly the candles will burn while heating the pots to give the warmth required. Moreover, the bigger the size of candles, the longer they will burn.
What are the options for a DIY candle heater?
We all have different tastes and opinions. Some will like this DIY yourself heater, while others will not.
Luckily, there are other heater options in the market. In that case, you can for multiple options in the market. Before buying your device, have a look our article on what size (btu) you heater should be.
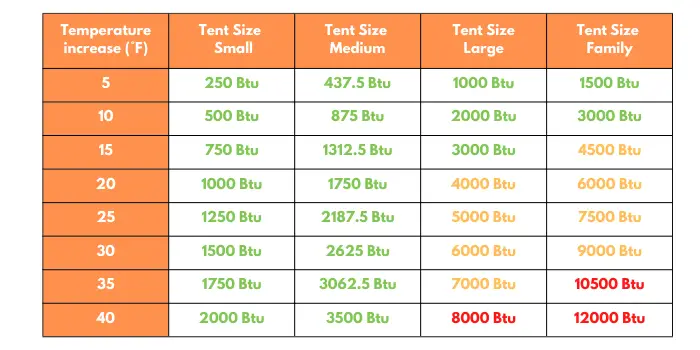
Overall, we recommend the following checking the size of your tent and the desired temperature increase (check table below).
Camping is a good summer activity loved by many until the temperatures start dropping. If you are brave enough to head out during the winter, you will need something to keep your tent warm.
There are many safe methods to heat a tent you can try. If you are on a budget or you want to try other alternatives to heating a camping tent, a DIY candle heater will keep you warm.
Other than using it outdoors, a DIY candle heater can be used at home to save you when the power systems are not working. It is environmentally friendly, efficient, and cost-effective.