The Camping Air Conditioner

air conditioner for camping

Camping Tips

Can you drink alcohol while camping? (How to NOT break the rules)

Who doesn’t love a good glass of wine or beer after a long day out in the bush? 

Alcohol can make you feel more relaxed and can be compared to a small dose of antianxiety medications, according to Healthline.com. However, can you drink alcohol when you are camping? 

Generally speaking, yes – there are no problems with it. But you MUST check your campsite regulations, rules, and even the existing laws in your State/Country. Even if it is legal, alcohol should be consumed in small doses and ia a recreative manner. 

Let’s go through a detailed explanation and tips around it in this article. 

Is it legal to drink while camping?

The answer to the question is it depends on where you are staying. Before opening your bottle of beer, read the next two steps. 

Step 1 - Always check the rules/laws of your City/State/Country

First, we recommend checking if public drinking is allowed in your City, State or Country. 

For example, the map below was extracted from www.thrillist.com, and it shows where you wouldn’t have problems opening your beer in public (jurisdictions in red have a public alcohol ban).

can you drink alcohol while camping US
Source: https://www.thrillist.com/

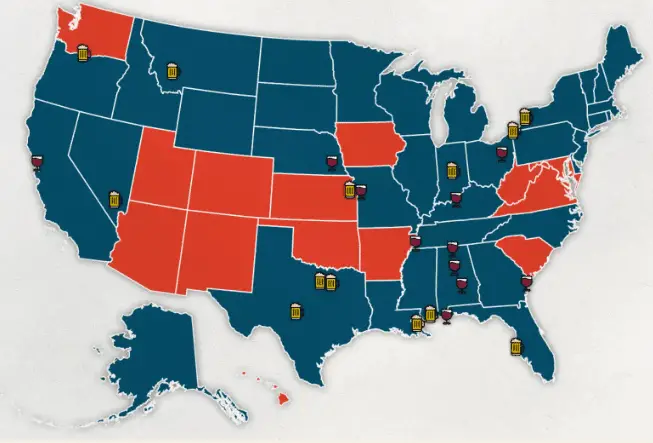
List of States that allow public drinking in US:

  • Idaho,
  • Wyoming,
  • North Dakota, 
  • South Dakota,
  • Minnesota, 
  • Wisconsin, 
  • Illinois,
  • Michigan, 
  • North Carolina,
  • Delaware, 
  • New Jersey, 
  • Connecticut, 
  • Massachusetts,
  •  Rhode Island, 
  • New Hampshire, 
  • Vermont, 
  • Maine,
  • and Alaska 

Editor’s Note: If you are in one of the States in the red color, check the specific campsite policies (Sometimes, alcohol may be allowed under certain circumstances). 

Step 2 - Check the rules of your campsite

If you are in the blue area from the map above, you need to check the specific rules of your campsite or park. How do you do it? 

Easy, you need to access the website of National Park Services and look for the alcohol policy of your campsite. Some examples of alcohol policies are detailed below: 

a) California Department of Parks and Recreation  – “The possession and/or consumption of alcoholic beverages (this includes alcohol poured into a different container) is prohibited in all day use areas. Alcohol is only allowed in your overnight camp site and you may also consume alcohol from a vessel.” 

b) Oregon State Parks –  You may bring alcohol to parks, except where specifically banned. Some parks require written approval from the park manager. For information, call the park directly, or call the Information Center at 800-551-6949. And of course, no one younger than 21 can possess or drink an alcoholic beverage.

If you are not staying in a campground, check the rules and laws of the place you have pitched your tent – otherwise, you might end up with a fine or jail!

If you are hiking or camping in an isolated location, be mindful of garbage production and never leave cups and bottles behind and follow the rules of public drinking. 

can you drink alcohol while camping - summer camping

What drinks Drinks to bring for camping trips

Each camper has your preference, but we recommend refreshing drinks made of fruits and options that may help with hydration during hot weather, such as:

  • Light Beer (i.e. lager) 
  • Pre-mixed drinks
  • Camping cocktails 
  • White wine (cold)

An esky cooler box will keep your beverages at the right temperature and refreshing during summer days. If you have some cocktail skills or want to create a fun social activity, why not get one camping cocktail kit

Our recommendation is to pick stirred drinks, such as negroni, manhattan, godmother, and many others. 

During cold nights, hot drinks might help to keep you warm over a campfire and close to your heater. Some options are:

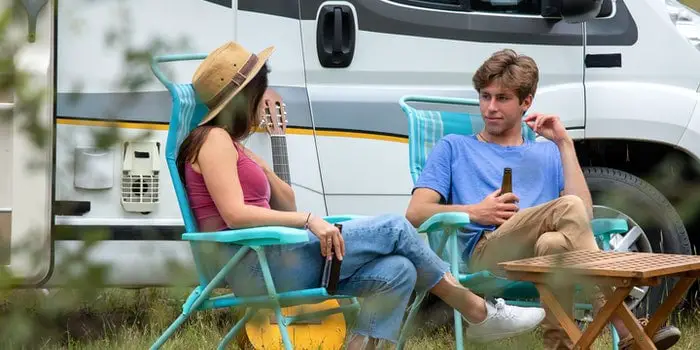
Drinking while camping - Safety Talk and Good Etiquette

If you have done all your checks and certified that you can drink in your camping area, remember some general rules and advice about alcohol consumption:

  • Underage drinking is not allowed
  • Never drink and drive, operate or use camping gear that might lead to an accident (i.e. heaters, sharp knives, etc.)
  • Don’t drink before going for hikes or practising any sports or activities that might require physical effort 
  • Avoid drinking too much – the last thing you want is to have a hangover during your camping trip
  • Prepare snacks and keep eating while your drink – this will help your body to control alcohol digestion better 
  • Drink plenty of water and keep your body dehydrated
  • If you are camping in high altitudes, be mindful of 
  • If you are in a campground, be aware of your neighbours and respect their privacy
  • Keep the site clean 

How to live in a tent long term? (7 Tips to make it comfortable!)

The Camping Air Conditioner is sponsored by readers. When you buy through one of our links, we may earn an affiliate commission at no extra cost to you.

If you are camping affectionate and love nature, living permanently outdoors in a tent has already crossed your mind, right?

However, if you are considering this, you should have in mind that  it would be best if you were careful and took into consideration a couple of issues before packing (how to address them), such as: 

  • The size and type of your tent,
  • Campsite location and infrastructure
  • Cooking your meals and potable water
  • Weather conditions
  • Items that will improve comfort
  • Security
  • Personal Hygiene aspects. 

Let’s go through them below, but first, let’s highlight the benefits and drawbacks of living in a tent full time. 

Living in a tent for the long term - advantages and disadvantages

As much as we love the concept of living camping 24/7, we need to be honest with ourselves and check whether the benefits of doing it outweigh the drawbacks. So let’s review them below.

Advantages
  • Saves money
  • Minimalism
  • Simple life and contact with nature
  • Mental health
  • Mobility (nomadism)
Disadvantages
  • Limited space and comfort
  • Cleanliness and personal hygiene
  • Limited (or no) electricity supply
  • Protection against weather
  • Security and health concerns

Benefits of living in a tent permanently

Well, there are plenty of advantages that we can mention, such as:

  • Saves money – Yes, say goodbye to rent, mortgage, household taxes, and utility bills.
  • Minimalism – If you are moving into a tent, you probably will realise how much stuff you have that can be donated or thrown away (happiness is not material!)
  • Simple life and constant contact with nature – Yes, you will have a simpler lifestyle and probably start appreciating other aspects of life, such as simply sunbathing or listening to birds in the morning.
  • Mental health – If you recharge your batteries by being in touch with nature, there is no need to say how much your happiness and mental health levels will increase when camping. No wonder why some many people move from big cities, such as New York, to the smaller countryside areas to enjoy life. 
  • Nomadism – Not happy with your campsite or even weather conditions? Why not pack and move around looking for another perfect spot to live – you can go beach camping in summer and stay in the forest during the cold season – it is up to you. 

Challenges of living in a tent permanently

Among the challenges of living in a tent permanently, you should remember the following topics:

  • Limited space and comfort – Unlike your apartment and house, which offers multiple and isolated rooms, your tent will have a limited space to move around, and comfort levels will be much lower compared to a typical dwelling.  
  • Cleanliness and Personal Hygiene – Even though you might find a sustainable way to live in harmony with nature, it might be challenging to deal with garbage production and personal hygiene at first. 
  • Electricity – You might not have electrical infrastructure close by your tent, which is a significant challenge for living these days. 
  • Protection against bad weather – Regardless of whether you are camping in summer or winter, extreme weather conditions might significantly impact you and be a challenge during your stay in a tent. 
  • Security and health concerns – Unfortunately, you are not 100% safe anywhere. Overall, tents are fragile and might draw the attention of criminals. If you are camping in a remote location, you never know when unexpected events that might require immediate medical attention will happen. 

If after reviewing the benefits and challenges, you are still considering living in a tent full time, check our 7 most important tips to make it comfortably!

7 Tips to live in a term long term comfortably

1. Choose the appropriate tent

Choosing an adequate tent will probably be one of the biggest critical factors in allowing you to live comfortably in your tent. Overall, we recommend the following:

  • Invest in a robust tent with plenty of interior room, awnings/vestibule, multiple openings and strong structure. 
  • As for shape, if possible, stick to wall, cabin and bell tents since they provide much more space than dome tents, which have sloped walls
  • Consider a tent that has internal divisions and different rooms. 
  • Preferably, pick a canvas tent since it will provide better breathability and thermal insulation in both summer and winter (if possible, choose one with a stove jack so that you can use a stove inside it safely)

Our recommendations are:

Tent  Material Shape Capacity Internal Rom Awning/
Vestibule
Price  Availability 
Whitduck Avalon Tent Canvas Bell Up to 12 Campers  Yes (optional) Yes (optional) $$ Check on Amazon
WhiteDuck Regata Canvas Bell Up to 8 Campers  Yes (optional) Yes (optional) $$ Check on Amazon
Core 12 Person Extra Large Polyester Wall Up to 12 Campers  Yes  (included) No $ Check on Amazon

Note: We have undertaken a detailed review of avalon model – click here to read it.

WHITEDUCK Avalon Canvas Bell Tent
  • Luxury design and ample internal room 
  • Excellent breathability
  • Top-notch insulation
  • Canvas made

2. Choose a camping location with good infrastructure

Your camping location is as crucial as the perfect tent. Consider the following items if you plan to live in a tent permanently:

  • Are there electric hookups available, or is it completely off the grid?
  • Are there toilets and showers?
  • Do you phone/internet network?
  • Does it have constant maintenance, or will you be required to maintain the whole area (if so, which tools will you require)?
  • Is it close to urban places in case of an emergency (medical attention, police station, supermarket, etc.)?

If you plan to do it in a national park, check its amenities on the National Park Services website

3. Consider meal preparation and potable water

Have you thought about cooking and your kitchen? What will be your approach? We highly recommend you have a camping stove with you and have the skills to start and maintain a campfire. 

Many campers discuss which one is the best – campfire or a stove – but we think that if you plan to live permanently under a tent, you should have both. 

Regarding stoves, pick a propane or butane model with at least 10,000 Btu for each burner and with at least two burners – we reviewed different models in this article

Important note: Butane Stoves might not work in temperatures below 0 Celsius Degrees.

Our indicated long-term camping stove model is GoPluss Outdoor Propane Camping Stove with 3 Burners. You can also consider bringing canned and perishable food, such as canned beans, tuna, and rice. 

The other important question is: How will you get potable water to drink? Are you planning on boiling it every day or bringing a package of bottles that will need to be reinstated every now and then? 

4. Protection Against Weather Conditions

On this front, canvas tents are a go-to option since they provide optimal breathability and insulation for both summer and winter camping.

Consider bringing a tent heater for the cold season – it will keep you warm and cozy in freezing conditions. Similarly, a tent air conditioner for scorching days might be the ultimate option. 

If you are camping off-grid, the best position to pitch your tent during summer and winter might vary – for example; you might want to have more sun exposure during colder days than in the hot season. 

5. Invest and bring items that will improve your comfort

Apart from the gear listed above, it might be a good idea to bring extra items to ensure comfort, such as:

  • Pillows
  • Warm blankets
  • First-aid kit
  • Mosquito repellents
  • Sleeping bags (might be worth checking which one is better for your every season – don’t use a winter model in summer; otherwise, you are going to sweat the whole night)
  • Thermal clothes and layers
  • Waterproof boots
  • Solar-powered generators, such as Jackery 1800W (they might save extremely helpful for off-grid camping).
  • Powerbanks 
  • A propane-powered hot water device, such as Mr Heater XB-13 base camp (picture below)
Mr. Heater F235300 BOSS-XB13
  • Portable battery operated propane shower system
  • Increase water temperature up to 35-degrees above source (incl. Anti-scald protection and safety tip-over)
  • Matchless electric ignition produces instant hot water

6. Security

Well, it is always good to be on the safe side and consider preventive security measures to ensure a safe stay at your tent. Some tips are:

  • Always use a locker. 
  • Look for safe campsites/campgrounds – before choosing your preferred location, check whether there have been any incidents in the area recently.
  • If you have valuable items, leave them inside a special box or your car. 
  • Keep your camping area with plenty of light and easy accessibility.
  • Make sure you have insurance in place for items of significant value. 

7.Personal Hygiene

If you are not at a campsite, it might be a good idea to:

  • Bring a pop-up shower tent (picture below)
  • Consider how you are going to wash and dry your clothes – bring a rope and  
  • Use eco-friendly shampoo to not pollute the environment around you
  • Be careful with garbage – if you are producing organic products, it might be worth considering a compost bin. Other residues should be separated, and you should take them to the closest bin according to their classification.
Green Elephant Camping Shower Tent
  • Quick pop up privacy: 
  • Fits tall people with At 6' 10.7" high and 3' 11" in length and width
  • Towel and Clothes hanger, toilet paper holder, and personal item pocket

FAQ

Is it legal to sleep in a tent for long term?

It depends on the jurisdiction of your Country and State. There are many different rules and laws that differentiate, and we recommend you consult a lawyer.

Our understanding is that you can live in the woods/forest with no problems in some states of the US, such as Colorado, Idaho, and Nevada, but you cannot pitch a tent in your backyard and live there (crazy, isn’t it?).

Again, that is our understanding (not legal advice or opinion), and we recommend you check with your lawyer and review the existing legislation.

Conclusion

Living in a tent full time might be a unique experience with plenty of learning and unexpected situations. Bear in mind that you might face some challenges related to comfort, but you might save significant money!

How to heat water while camping WITHOUT a campfire?

There is no need to say that bringing water is essential for every camping trip – keeping hydrated is crucial for your health. However, sometimes you might need to boil water during your outdoor days for various reasons, such as having a hot shower on freezing nights, cooking something, or simply drinking a warm coffee. 

If you plan to camp during a fire ban season or prefer not to start one, you might need to find alternative ways to heat your gallons of water. So, how to heat water without a campfire? There are many ways, including:

  • Using a camping stove
  • Use a jet boil system
  • Using an kettle (with or without electricity) 
  • Using an electric skillet
  • Use a solar cooker/stove
  • Solar heating bags (solar shower)

Let’s go through each method and quickly discuss the benefits and drawbacks. 

how to heat water while camping without a campfire

Why do you need to boil water while camping?

The most important reason why boiling water is necessary for your health safety. If you run out of potable water after camping for a few days, you might be inclined to use water from a water main close to your campsite. 

Even though countryside and camping remote areas tend to have much less pollution than big cities, these water mains might still have some bacteria and viruses that would make you sick in case of ingestion. 

But don’t worry – if you properly boil it, you will be killing the majority of microorganisms and have a potable and drinkable liquid. 

Other reasons for heating water while camping includes cooking, bathing, and preparing hot drinks, such as coffee and tea. 

6 tips heat and boil water while camping without a fire

Let’s go through each option in the following paragraphs!

Use a camping stove

If you are an experienced camper, you might already have a camping stove. There are multiple options in the market, and we like to use propane models because of their versatility. 

To use for cooking and boiling water, you need a model that provides at least 10,000 Btu (per burner), such as Coleman Triton propane stove.

The downside of this method is the extra gear you need to carry around – both the device and fuel. If you are a hiker or backpacker, it might be worth exploring other lighter alternatives, such as MSR Pocket Rocket Ultralight Camping Stove (it only weighs 280g).

Use a JetBoil System

Jet Boil is an amazing backpack stove specially developed for backpackers. It has an excellent heating output to cook and boil water really fast. 

The equipment is small and compact and fits every camper. However, it comes with a drawback – even though it will heat any liquid extremely fast, you won’t be able to simmer water or control the level of heating output. 

If you are just after boiling water to drink in a fast and compact way, JetBoil Fast must be your gear. If you want something that also allows to cook and control temperature/flames, go with a camping stove option. 

Note: JetBoil might be a viable alternative to cook some specific food, such as noodles, dumplings, and soups – check some special recipes here

Use a kettle

If you have an electric hookup at your campsite, the number of alternatives increases dramatically (good news!). 

One of them is using an electric kettle. There is no secret here – you just put water inside the equipment, turn it on for a couple of minutes, and you are fine! 

If you don’t have electric infra around you, but your car is close by, you can also use a car kettle, such as sunsbell 650ml car kettle

Use a Electric Skillet

Similarly to the dilemma between Jet Boil and a Camping stove, if you have an electric connection at your campsite, you might also stay between an electric skillet and a kettle.

If you only want to have hot water, use a kettle. If you want something that goes beyond and allows you to cook, an electric skillet should be your option (check our post with the review of the best electric skillets for camping and special recipes). 

Use a Solar Stove/Cooker

Yes, that is right. You can boil water with your cooker/kettle powered by solar energy. There are plenty of options in the market for solar-powered stoves, such as Go Sun Go Solar stove, which reaches up to 550 Fahrenheit degrees and easily sterilizes the water.

The upside is that you can also cook with it – if you want a detailed review of solar stoves and how to use them, visit our article about them – can you cook with solar energy while camping?

Use a portable solar shower

We left this option as the last one on purpose – if you are just after something to heat water to provide you with a warm shower while camping, you do not necessarily need to boil it.

Warm water might be sufficient to give you some comfort during your bath, and a portable solar shower might be the option to go, such as advanced elements solar shower.  

Other alternatives for hot shower while camping

If cold showers are your worst energy when you go camping, how about checking Mr Heater Battery Operated Shower Systems (aka B.O.S.S)

They are an excellent solution for having a hot shower when camping in remote locations since they run from batteries (for ignition) and a 1lb propane tank (to create flame for heating), providing hot water for approximately 40 minutes (depending on the model). 

It comes in 3 models with similar features but slight different capacities (check the picture below).

mr heater boss comparison

All the three models (XB-13, XW-18 and XC- 20) come with hot water safety flow switches and filters to avoid debris coming into the equipment (if the water available at your campsite has some). 

Conclusion

Well, if you don’t like the idea of a campfire or your campsite has a fire ban policy in place, don’t worry – there are several other ways to have hot water, as shown above.

Our preferred approach is taking a camping stove and portable hot showers, given their ease of transport and installation. But we understand that every camper has different needs, and the final solution will suit their needs.

How do you camp in a small car? (Comfortably with 7 tips!)

Camping in a small car might not be super convenient, but you can enjoy your adventure with adequate preparation and proper gear. Many campers ask me – Can you sleep in a small car? How do you camp in a small car?

Yes, you can sleep in your car, but you might need to follow some safety measures to avoid anything unpredictable. You will have to understand the space limitation and plan your trip accordingly. Therefore, to camp in a small car, you should: 

  • Go with multi-purpose and small camping items and use your space intelligently. 
  • Bring a car mattress and window screens to improve comfort and safety.
  • Set up your car and maintain it clean
  • Invest in a rooftop rack or rooftop box
  • Consider a rooftop tent to allow for more space.
  • Consider an awning tent
  • Have a back-up plan

Let’s go through these tips in detail below and try to answer common queries from car campers! 

how do you camp in a small car

How to camp in a small car - 7 Tips to make your trip comfy!

Tip 1 - Pack smartly

So, first things first, you will have to start packing in a clever, compact and organised manner to save space inside your vehicle. Pack your essentials, including food, drink, and emergency supplies, and keep them on the front passenger seat to facilitate access. 

Once you have finished your essentials, consider extra items to allow for extra comforts, such as pillows, foldable chairs and tables, firewood, and any other items that you might deem necessary.

Also, I prefer multipurpose items while camping in your small car. Find gears that can serve two to three purposes, and you can manage with only a few things if most of them are multipurpose. 

For example, with a smartphone you probably do not need to carry a GPS or a music player. Also, you can use the tube of toilet paper as a campfire starter, the sweater as your pillow, and one cup for all the drinking purposes.

You might not have access to power in your location, so consider bringing:

Tip 2 - Use car specific camping gear

There is some essential car camping gear that will help you during your trip, such as:

  • A car inflatable mattress – you will need to find one that fits your car model (check some options). They will provide you with better comfort and a flat surface and prevent a sore back. No need to say how easy they are to inflate, pack and transport, right?

However, it is essential to understand what is your preferred sleeping configuration. Some people prefer sleeping on the back seat, while others fold back the front seats and prefer this configuration.

In our opinion, the most comfortable way is folding the back seat and putting an inflatable mattress through your car back (see below). 

how to sleep in the back of a small car
  • If you are camping in summer, you might need to leave your windows wide open, and the last thing you want is insects, mosquitos and other animals entering your car! Consider a car window screen that will ensure ventilation and protection. 

Tip 3 - Set up your car and maintain it clean

Once you have decided on your sleeping set-up, think about your car as your tent at a campsite. Therefore, remember to: 

  • Bring a bin to throw away your garbage (keep the interior clean and food correctly stored to avoid bad smells)
  • Bring an outdoor portable shower and toilet paper. 
  • If you are camping in winter, consider a small heater.
  • In summer, park your car under the shade and in ventilated areas. A solar powered camping fan might help as well. 
  • Don’t forget to bring lanterns and lights for nighttime (it might be a good idea to get a 12V model compatible with your car battery)
  • If possible, bring foldable seats and a table

Tip 4 - Invest in a rooftop box, bag, or hack

A rooftop box and hack might help you in your camping trips and on your day-to-day tasks. You can find plenty of different models available, but we recommend the following:

  • Rooftop Bags – Low investment for occasional campers – consider a rooftop bag – they will serve the purpose and help you to transport your gear costing around $50. Our recommendation here is FIVKLEMNZ 15 Cubic Car Roof Bag that already comes with door hooks, and there is no need to install anything in your car.  You can upgrade for bigger models, if you need to

FIVKLEMNZ 15 Cubic Car Roof Bag 

  • Rooftop racks – Medium investment for all campers – The variety of models and sizes for car racks is infinite (crossbars, baskets, etc.). They are a great option for those who want to transport oversized gear, such as bikes and kayaks. Before buying one, it is better to review your requirements and match your needs with the chosen model. 
  • Rooftop box – Medium-to-high investment for all campers – Rooftop boxes are an excellent alternative to carry your load around and ensure flexibility. The advantage is that once it is installed and you do not need to be installing and removing it every trip (as with rooftop bags). As with the other models, there are multiple options in the market, but we are a fan of the Thule rooftop cargo box, which comes at different sizes and prices – check your needs and get your preferred model.

Thule rooftop cargo box

Tip 5 - Consider rooftop tents

Rooftop tents will allow you to camp anywhere with your car and ensure plenty of internal space. If you are a frequent camper or intend to go for long-term trips, there is no need to say that this is the best option. 

There are multiple models available, and you need to check whether they are compatible with your small car or not. Usually, there is a variety of models for SUV and 4WD vehicles, but the Thule Tepui line is suitable for small cars. 

If you have a truck – you are lucky! There are several models to use the back of your vehicle as your shelter

Tip 6 - Consider an Awning

A foldable awning tent might provide you with external space to prepare your meals, protect yourself from the sun, and have some time outside. 

Some models can be attached to the back of your car and can provide you with significant extra room, such as the redcamp waterproof awning sun shelter

Tip 7 - Have a backup plan

It is always essential to have a backup plan if things go wrong. Bring a small pop up tent and a foldable sleeping bag just in case! 

It might be a good idea test your car set up before going to the road!

How do you sleep in the back of a small car?

First, park your car in a secure and legal place and turn the engine off. 

Make yourself comfortable in the backseat and crack a window to ensure enhanced airflow. Closed windows might cause condensation build-up and create an uncomfortable and humid environment. 

Fold the rear seat bench and use an inflatable mattress that fits your car back. An inflatable bed will offer you the desired comfort and improve your night’s sleep quality. 

Avoid sleeping with the head propped up against your car’s door or windows since you might get neck and shoulder strain (use a travel pillow if you have one). 

Additionally, you can use clothes and screens to cover windows and get the desired privacy while resting in the backseat. A private space will support your sleep and prevent the sunlight from entering and disturbing your sleep.

Even though cars are not airtight and you can breathe in them, it is good to leave some areas slightly open to allow for ventilation. Be careful, though; some people think they can leave the climate control system working (AC / Heater) while sleeping in the car, but this is dangerous and you shouldn’t.  

You can turn your AC system (and engine) on for a couple of minutes to reach your preferred temperature but never sleep with the car’s engineer switched on. 

The fuel combustion releases carbon monoxide (CO) into the air, which increases the concentration of this gas (especially because your vehicle is parked and there is no air circulation). 

The danger is that CO is odourless and colourless, and you cannot notice its presence in the air. Breathing it for a prolonged time in high concentrations might cause some symptoms, such as nausea, headache and even death in the worst-case scenario. 

Conclusion

We hope this article helps you to plan your next camping trip. Car camping can be comfortable and enjoyable if you have the proper gear and plan your days away carefully!

Can you use propane in a butane stove? (Why you shouldn’t!)

Gas stoves, including butane and propane, are excellent options for off-grid campers. They provide cooking flexibility, have flame control mechanisms, have plenty of fuel availability, are extremely safe, and produce no fumes. 

If you have a butane model, you probably have wondered or heard another camper telling you that can you use both gases in your equipment. So, ultimately, can you use propane in a butane stove? 

The answer is yes, in theory, you can! However, you must have a suite of specific adapters (Lindal valves and hoses) and fittings to use your stove safely, and even so, they might not have optimal performance, increase fuel consumption (i.e. bad flames – aka yellow flames), and introduce carbon monoxide poisoning risks.

Let’s keep discussing the similarities and difference between these two gases, and understand the impacts of using them interchangeably. 

can you use propane in a butane stove

Propane and Butane - Similarities and Differences

Propane and Butane - Similarities

Butane and propane are a derivative of petroleum and a form of liquified petroleum gas (LPG). Both gases are widely used for commercial purposes and widely used by campers not only for cooking but also for camping heaters.  

They both have high amounts of carbon particles in their composition and have excellent flammability features. However, they also have some discrepancies – let’s explore them below. 

Propane and Butane - Differences

Even though both gases come from the same source, they have different characteristics in many ways. We recently wrote a blog post and undertook a detailed comparison between propane and butane for camping stoves – read it for a thorough explanation.

In summary, the major differences are:

  • Boiling point – Butane has a much higher boiling point (-1°C) than propane (-42°C), which means butane is not ideal for camping in freezing conditions. 
  • Heating output – Butane releases slightly more heat per pound than propane, but the difference is not significant. 
  • Weight – Propane is less dense than butane, but because it is stored under pressure and requires more robust bottles, its canisters are heavier.
  • Storage – Overall, Butane has more storage needs than propane (no exposure to the sun and temperature control). 
  • Costs – Since they are petroleum derivatives, their prices fluctuate following oil commodity prices. However, propane is generally cheaper than butane in the US. 
  • Cooking – Butane is approximately 12% more efficient than propane.  

Why you shouldn't use propane in a butane stove?

As you have seen, even though both gases are good options for camping cooking, they have significant differences that make butane stoves and propane devices different equipment with different internal mechanisms to facilitate combustion. 

If you use them interchangeably, you might face bad functioning. Butane stoves are regulated and engineered to burn the fuel that takes its name, meaning that its valves precisely regulate the amount of oxygen required to burn it properly. 

Propane requires more oxygen than butane for complete combustion, and when it is used in a butane stove, its combustion is only partial. There are many problems and signs associated with this partial process, such as:

  • Yellow flame, which is a clear sign that your burner is not being supplied with enough air 
  • It also indicates an increased release of monoxide carbon (CO), which is dangerous and toxic and might lead to poisoning.

The biggest concern around CO is that it is odorless and colorless. You can get poisoned without noticing, especially if you are cooking in a closed environment, such as inside your tent. 

Among the signs of CO poisoning, we highlight: 

  • Nausea 
  • Headache
  • Vomiting
  • Shortness of breath

If you experience any of these symptoms while using your gas camping stove, turn it off immediately and ensure plenty of ventilation in your camping kitchen (or simply leave the enclosed area and go outdoors). 

Overall, we do not recommend using gas stoves inside your tent, and we have written an article on how to use them in your shelter if you have no choice (i.e. in case of terrible weather outside). 

Are there any stoves that can run from both propane and butane (dual fuel stoves)?

Yes, there are. They are specifically designed to allow the use of both gases and run on them perfectly. Our recommendations are Gas One Propane and Butane Stove (budget-friendly) and Grill Boss Dual Fuel Camping stove

Gas one comes with many built-in safety mechanisms, such as the Pressure Sensor Cartridge Ejection System And Gas Flow Cut Off Mechanism (Butane). As for size, we recommend at least 8,000 Btu to allow for proper cooking. 

GasOne dual fuel camping stove

Grill Boss outdoor is another excellent option that comes with gas shutoff mechanisms inc case inaccurate gas flow is identified.

Grill Boss Dual Fuel Camping stove

Can I use a propane-butane adapter in my stove?

As discussed above, we do not recommend using them since you might face malfunctioning and expose yourself to many risks that are not worth assuming, especially considering the low investment in a dual fuel model (below $50!)

When should I use propane or butane?

Well, each fuel comes with benefits and drawbacks. Overall, we recommend the following:

  • Propane stoves will work better during harsh winter conditions because of its lower boiling point. 
  • Backpackers and hikers broadly use butane stoves because of the weight of butane canisters (they are considerably lighter than propane cylinders).

However, to pick one, you should also consider availability, costs, and storage requirements before making your choice. 

Conclusion

Even though some campers use adapters to use propane in butane stoves, we are against this approach because of our safety concerns.

We believe that the investment of having a dual fuel stove or simply having a butane and a propane stove outweighs the benefits of using these adapters, given the risks of malfunctioning, explosion, and CO poisoning.

How do you camp in the snow safely? 7 tips to keep you warm and secure!

Camping in the winter is a different experience than camping in the spring, summer, and fall. Even though staying outdoors with the snow may sound scary at first, you will be prepared for a winter adventure with the right gear and hacks. 

Snow camping can be daunting, and to ensure you are safe, make sure that: 

  • Choose the best location to pitch your tent and secure it – avoid a campsite that is sloppy 
  • Bring adequate camping gear (winter tents or hot tents, snow stakes, sleeping bags, tent heaters, etc. )
  • Wear the proper clothing and dress in multiple layers
  • Create a thermal barrier and insulate your tent
  • Always stay dry
  • Urinate more often to avoid losing body heat 
  • Stay off areas with animal tracks, like bears. 

Let’s go through these tips and below and answer some important questions about camping in freezing weather. 

how do you camp in the snow safely

7 Tips for snow camping

Choose the best location to pitch your tent and secure it

Planning is one of the keys to successful winter camping. When it comes to the campsite, avoid pitching your tent in open areas with plenty of wind exposure.

The technique of securing a tent in the snow is not hard. First, you have to know what is around you. 

Avoid setting up in areas with tree branches and bough heavy with wet snow. They snap easily, especially if a strong wind passes. One that falls on your tent can damage it or cause an injury.

Also, with rapid snowfall, consider the risk of an avalanche. Check whether the pitching area is clean and avoid any slope greater than 20-degrees because it can present an avalanche danger. 

 Before setting your tent, pack down and walk on the site smoothly. This will reduce the sinking due to body heat melting the snowflakes. Use a snow shovel to remove soft powder and pitch your tent on a solid base. 

You can use the layer you removed to build a “snow wall” a foot high around your tent to act as a windbreak.

If you don’t have a snow shovel, walk over the pitching area gently to compact the top layer and create a solid base. 

To secure the tent on the ground, ensure your tent lines hold for many anchoring points and use special snow pegs and stakes (see model below) to make sure it is properly fixed. 

Finally, while camping, ensure that snow does not accumulate on your tent’s roof – excess snow build-up on the roof will cause the tent to collapse, mainly if the snow is wet. 

Bring the adequate camping gear

You need to be prepared to go camping under 0 Celsius degrees, including having the right gear. On your trip, you must bring:

  • A powerful tent heater to help you keep warm on cold nights
  • If you plan to stay out for a couple of days or weeks, it might be a good idea to consider a hot tent (tents with stove jacks), which allows you to have a portable wood-burning stove inside it to keep you warm.
  • sleeping bag with a great insulation rating

Wear proper clothing and dress in layers

Make sure you bring suitably clothes and accessories for snow camping, such as:

Overall, synthetic fabrics will provide better insulation, but wool is also known for its exceptional heat retention features.

As for layering, it is up to each camper. If you are always cold, it might be worth considering wearing a base thermal layer and synthetic shirts below your jacket. 

Create a thermal barrier and insulate your tent

We wrote a specific article on how to insulate your tent for winter camping – read it here.  

The most efficient way is to create a thermal barrier inside your tent to avoid the warm air inside it escaping outside and the freezing breeze from the outside do not enter your shelter. 

To insulate your tent, you can use a tent insulation liner or use a reflective foam or foil.

Always stay dry (and keep you gear dry as well)

Staying dry is crucial to keep you warm and avoid getting sick. Moisture can make your body lose heat faster, and exposure to water for a prolonged period during winter can lead to hypothermia and frostbite.

Our tip here is to wear layers, which will allow you to keep warm and dry. If an outer layer gets wet, replace or remove it and dry it as quick as possible.

Similarly, keep your camping gear and extra clothes dry – it might be a good idea to keep electronic devices and gadgets in a bag to avoid moisture exposure (you can use a Ziploc bag!).

Urinate more often to avoid losing body heat

Maybe you never thought that peeing would influence the body’s temperature, right? In fact, it does.

Generally speaking, we tend to go more often to the bathroom on cold days. Our body tries to retain heat by compressing our internal vessels and reducing the blood flow towards our external skin.

Our blood pressure increases since we have less space in the veins to pump the same amount of fluid. As a consequence, our kidneys work more and use more water to reduce blood pressure, increasing the amount of urine in our bladder.

When bladders are full, our body tries to keep its internal liquid warm, spending more energy and deviating the focus to keep you warm. Therefore, urinating more frequently will help you keep your body’s internal temperature higher!

Interesting, isn’t it?

Stay off areas with animal tracks, like bears.

You don’t want to encounter a bear or other wild animal (i.e. foxes, coyotes, etc.) while snow camping, right? Before pitching your tent, have a quick look around your campsite and check whether you can identify any potential track traces. 

Polar bears are amongst the most aggressive animals in the world and are considered extremely dangerous for humans. This article details how to multiple animal tracks on the snow. 

camping in the snow - polar bear

FAQ

How do campers stay warm in the snow?

With the proper preparation, winter camping can be an enjoyable experience. However, if you are not prepared, it can be miserable, and you might even need to finish won’t even finish your adventure. 

On your next winter camping trip, here are essential tips you can use to keep warm: 

  • Dress in multiple layers to give you enough control over regulating the body temperature 
  •  Instead of one sleeping pad, have two. Two sleeping pads provide more warmth than one pad 
  •  Layer your winter sleeping bag with a feather-weight quilt for warmth
  •  Put on a balaclava to trap heat and increase the overall body heat
  •  Vent your tent partially to let the trapped moisture escape 
  • Wear heated boots, heated gloves, and hand warmers. 

Can a tent withstand snow?

Ensuring your tent is not topped with snow during winter camping is vital. 

This prevents the tent from sagging and tearing because of the excess pressure. Every tent is unique in its way, depending on the design. 

It can be tricky to determine how much snow a wall tent can withstand. Snows vary significantly in weight due to outside temperature, snow’s composition, and many more. Generally, the larger the tent’s canvas, the more snow it can withstand. 

Your tent should be constructed from sturdy materials that will withstand tear, and it should have ample insulation, which will ensure you are warm in the cold. 

Even with a 16″ x 24″ tent, your tent can still be damaged by snow. So, take important measures to protect your tent, frame, and fabric. 

In snow camping, avoid purchasing a tent with a large surface area because it will carry more snow load, which increases the chances of your tent collapsing. If possible, have your tent roof slightly inclined, which helps to prevent snow accumulation. 

Keep in mind that wet snow can be three times heavier than the same volume of dry snow. 

What is a winterized tent?

Ensuring your tent is not topped with snow during winter camping is vital. 

This prevents the tent from sagging and tearing because of the excess pressure. Every tent is unique in its way, depending on the design. 

It can be tricky to determine how much snow a wall tent can withstand. Snows vary significantly in weight due to outside temperature, snow’s composition, and many more. Generally, the larger the tent’s canvas, the more snow it can withstand. 

Your tent should be constructed from sturdy materials that will withstand tear, and it should have ample insulation, which will ensure you are warm in the cold. 

Even with a 16″ x 24″ tent, your tent can still be damaged by snow. So, take important measures to protect your tent, frame, and fabric. 

In snow camping, avoid purchasing a tent with a large surface area because it will carry more snow load, which increases the chances of your tent collapsing. If possible, have your tent roof slightly inclined, which helps to prevent snow accumulation. 

Keep in mind that wet snow can be three times heavier than the same volume of dry snow. 

How do you winterproof a tent?

Staying warm while winter camping can be a challenge. High winds, cold temperatures, and excess snowfall create harsh conditions that make it hard to sleep.

 However, some ways can help keep your tent comfortable in the winter. Here are ways you can insulate your tent to stay warm: 

  • Bring a small tent so that you can close as much open space as possible to prevent cold from creeping in 
  • Use a thermal blanket to cover the tent 
  • Block the wind using a tarp 
  • Build a windbreak out of snow 
  • Use a sleeping pad under the sleeping bag to keep you warmer 
  • Use a tent insulation liner, such as Crua Outdoors Culla Maxx

Conclusion

Camping in the snow can be an excellent alternative for winter days if you have the right gear and camping accessories.

These 7 tips shown in this post will help you have a safe and enjoyable trip and make your snow camping unique!

Have a safe camping trip!

Camping Stove vs Wood Fire – When to use each?

So, you cannot decide between a camp stove and a campfire, and you want to go with a safe and easy way to make your camping hassle-free, right? Why do you need a camp stove when you can cook with a campfire? What is a safer option for camping? What is, ultimately, the best option?

There is no best option, but the one that will suit your camping needs better given that each of them comes with some upsides and drawbacks. In our opinion, the decision between the two options should depend on the time length of your trip, the conditions of your campsite, and personal preferences. 

Many prefer a campfire since they find it safe in the wild, praise the fact that almost no camping gear is required, and enjoy cooking and socialising around it. However, campfires can cause unfortunate accidents and pose risks to the life of campers and impact the environment adversely. 

On the other hand, a camp stove has many safety mechanisms and gives you more control and freedom. Overall, you will find cooking while camping effortless, but it will have some downsides, such as bringing fuel (i.e. propane or butane canisters).  

If you are here, it means you want to gather all the information before going ahead and making your decision. Keep reading this article to check our comparisons for camping stoves vs wood fires, and answer your queries. 

camping stove vs wood fire

What Are the Benefits and Downsides of Using a Cooking Stove as Compared to the Open Fire?

Both open fire and camp stoves will have some advantages and downsides. Overall, camping stoves offer you more comfort and flexibility, and you might experience fewer headaches (especially if it is raining – learn how to cook in the rain while camping here). 

Camping stove - Advantages and Disadvantages

Both open fire and camp stoves will have some advantages and downsides. Overall, camping stoves offer you more comfort and flexibility, and you might experience fewer headaches (especially if it is raining – learn how to cook in the rain while camping here). 

A camping stove will offer better convenience and control, which is essential for preparing different kinds of meals – a modern camping stove, such as the Coleman dual burner propane stove, come with valves that allow you to control flames

Furthermore, you do not need to worry about collecting dry wood and finding a safe to start a fire unless you are using a portable wood stove (which will require firewood). 

Furthermore, a camping stove can be used regardless of weather conditions, and you can cook your meal whenever required. The low and protected flame will be easy to manage, and you can shut it off instantly if you notice any danger. 

Be mindful, though – avoid getting your device wet since the water might damage the ignition and valve systems!

Camp stoves are compact and lightweight, allowing you to move them if required (i.e. in case of rain or you need to change your camping kitchen location, you will easily move them around).

They also come with internal safety mechanisms, such as precise valves and leakproof hoses, giving you peace of mind to use them. Overall, they also tend to generate a cleaner flame and will not cause large volumes of carbon emission, being eco-friendly solutions.

Some of the disadvantages of these devices are:

  • The need to bring and store fuel in your campsite
  • Costs associated with buying and using it are higher than a campfire
  • Maintenance is required to ensure proper functionality
  • Extra camping gear to be carried around

Wood fire - Advantages and Disadvantages

Some campers love the sensation provided by a campfire – a combined feeling of wilderness and coziness make them a go-to option for survivalists. 

Campfires are known to be cost-effective since you probably will need minimal camping gear (if any), such as a waterproof and windproof lighter. Less camping gear means less travelling load, which is ideal for backpackers and hikers. 

You can simply start a fire using some tinder and kindling and keep it going for hours with some good firewood (give preference to hardwood since they will burn longer and produce more controlled flames – if you want to know what is the best firewood for a campfire, read this article

A campfire can reach up from 900°F (~482°C) to 2000°F (~1100°C), meaning can you cook different types of meals. Further, you can also choose how big it will be, providing flexibility and scale, especially if you are camping in large groups. 

Some researchers have also concluded that campfires can bring some health benefits, such as relaxation and reduced blood pressure levels, which is incredible!  

However, on the downside, an open fire will require more safety measures, and you will have to be vigilant to prevent accidents. Some parks even do not allow it in the US – check the National Park Services website and your preferred park requirements.  

Also, wood fire will need a proper setup, and harsh weather conditions can be dangerous and extinguish the flames – You will not have complete control over the fire, and you might not be able prevent an accident. 

Even though you can always start a fire in a different place, once it is lit, there is no real mobility, which is not ideal for unpredictable weather conditions. 

Overall, cooking on an open fire is not easy for inexperienced campers since they need to master temperature control and other skills to prevent an accident. 

Is a camping stove necessary?

A camping stove might be necessary if you don’t know how to start and handle a campfire or if your preferred park does not allow campfires, or when there are wood fire bans.

Further, if there is a rainy weather forecast, considering a stove might be wise since you can easily move them around and cook during the rain. 

They are also the best option to prepare and/or heat uncooked foods and a reliable heating source to boil water, especially if you are camping or hiking in a remote location. 

If you have plenty of wood available or are not planning to cook on your camping trip, they are not required. You can bring crackers, nuts, pre-made sandwiches, and fruits and vegetables, and you will be fine for a short-term trip. 

In our opinion, it will ultimately depend on your camping duration. For short trips, such as weekends away, you will be fine without a camp stove, and a campfire might be actually a funny activity to practice with your friends and family. 

However, it might be good to have a camp stove for longer trips for convenience and safety – you shouldn’t solely rely on campfires for cooking, given the unpredictable weather and control of the quality wood available.   

When to use a camping stove or a wood fire?

Camping stoves are ideal if:

  • You don’t know how to set up a fire
  • You want more convenience and comfort
  • You want to have flame control and more safety mechanisms
  • You are worried about weather conditions
  • You don’t want to leave any trace behind 
  • You don’t want to impact the local ecosystem 
  • You don’t want to create dirt (campfires are normally dirtier than stoves)

On the other hand, wood fires should be your choice if:

  • You enjoy the coziness provided by campfires
  • You like the taste provided by grilling food on a wood fire
  • You are into survivalism 
  • You want to create a social activity while camping – an excellent option for gathering people and roasting marshmallows.

Can I use a camping stove in my tent?

Even though it is not ideal, because of the fire accident and CO poisoning risks, you can use a camping stove inside your tent provided you follow some important safety measures, which include:

  • Keep a constant flow of air circulation 
  • Monitor Carbon Monoxide (CO) levels using a  carbon monoxide detector 
  • Take any flammable material out from your tent
  • Use your camping stove over a  fire mat to prevent overheating
  • If possible, use a tent with a stove jack to exhale polluted air

A camping electric skillet might help you heat and prepare your meal if you have electric hookups and connections close to your tent.

For a detailed step-by-step on how to use a stove insde your tent, read this post

Conclusion

As detailed above, the ultimate choice between wood fire vs camping stoves should be driven by many factors, which include:

  • Weather conditions –
  • Comfort and convenience 
  • Cooking preferences, such as flame control and food taste
  • How long you will be camping
  • Impact on the environment.

We use both, and we don’t think one option should exclude another. There are multiple occasions the benefits of a woodfire will outweigh stoves’ benefits and vice-versa.

Whatever method you choose, make sure to check for potential fire bans on your campsite. 

Enjoy your camping trip! 

How do you cook while camping in the rain? (4 easy tips!)

Outdoor weather is always unpredictable, and the joy of camping cannot be ruined once the rain starts. Knowing how to cook when camping in the rain is a crucial ability to be a better camper and be ready for all unexpected occasions, such as a rainstorm. 

To cook in the rain while camping, you need to pay attention to some issues, such as choosing the most appropriate camping stove, knowing where to position your camping kitchen, and bringing the right camping gear. 

Let’s go through the detailed tips and answer the common questions raised by many campers below.  

how do you cook while camping in the rain

4 Tips to cook in the rain while camping

There are some tips and tricks that every camper should know to be ready to cook his/her meal, even if it is raining. As with everything in life, the more you plan and be prepared for it, the easier it will be.

Let’s dig into each tip below so that you can peacefully cook in case of water drops from the sky!

Tip 1 - Bring the the adequate cooking equipment and accessories

Bringing adequate camping gear and cooking accessories will make your life easier. 

This does not necessarily mean that you need to spend plenty of money – You can take some accessories you already have at home to help you. 

Some gear that you help you cook in the rain while camping include:

Tip 2 - Protect yourself with camping rain gear

If it is raining outside and you need to cook, it is better to be wearing appropriate gear. Otherwise, you will get soaking wet and might get sick. Below are some of our recommendations.

Tip 2.1 - Wear waterproof clothes

Even though cotton fabrics are usually more comfortable and provide better breathability, they can quickly get wet and drenched. Use options that will repel the water and keep you as dry as possible. 

It might be a good idea to bring the following items for your trip:

Give preference to synthetic fabrics, such as nylon and neoprene, since they tend to be durable and lightweight – Patagonia offers great alternatives. 

Tip 2.2 - Wear waterproof boots, hats, and rain coats

Also, it is good to carry some waterproof boots and hats. Boots should be high to avoid water penetration when you walk through the rain. 

A waterproof hat is also essential – protecting your head is necessary to avoid getting a cold from the rain.  

If there is a rain forecast, never leave your house when going camping without a raincoat and rain pants. Wearing this gear ensures you stay dry even when during a storm. 

Tip 3 - Plan where to pitch your camping kitchen and keep cleand it organised

Having the right equipment and cooking accessories will definitely help you. However, settling your camping kitchen in the right location and keeping it clean and organised is as important. 

As experienced campers, we advise the following: 

  • Avoid pitching your kitchen under a tree or potential landslide areas – you don’t risk yourself falling tree branches or water drippings.
  •  Organize your cooking area to be more efficient – i.e. keep accessories stored together and always clean – it might be a good idea to have a camping cabinet and a portable cooler
  • Portion your meals to make it easier to cook what needs to be prepared. Avoid bringing excessive food to the kitchen – it might become messy, and you might not have enough space to store it. 

Tip 4 - Use a camping tarp, umbrella, and a waterproof tent

To protect your cooking area, you can use a camping tarp (see option below) or use a rainfly to protect your outdoor kitchen from water. 

Another good idea is covering your camping area with an umbrella, but it might be not ideal because of the lack of stability and risks of blowing away with the wind. 

However, there are some excellent camping alternatives with pins that can be fixed into the ground, such as Sport-Brella Premiere X.

If you are considering moving your kitchen inside your tent, you might want to carefully read our article on this topic. To keep you safe, you should deploy the following measures:

Further, you should also consider a tent with at least 1000mm of water head protection. If you want to understand further about tent waterproofness, read this article – Are tents waterproof? (And how to waterproof them).

FAQ

Can you use a camping stove in the rain?

Yes, you can, but you should be aware that the exposure to water might damage the fire ignition systems of your camping stove, and therefore you should protect it from the rain.

For instance, avoid setting it under trees when setting your cooking area. In case it rains, water will start dropping from the branches. If you must set it under trees, set a camping tarp for protection.

In summary, there are no problems in using your camping stove whilst it is raining, but you should protect it from water.

Can a camping stove get wet?

Water might damage the ignition and internal valves from your gas camping stove. If you are using an electric option, you might be exposed to shocks. Therefore, we recommend avoiding exposing your stove to water.

If it accidentally gets wet, you must allow time for the stove to dry completely before turning it on – do not take any risks. 

How do you keep a campfire burning in the rain?

If you are not a stove fan and prefer a good campfire, you should do some tricks to protect it and keep it burning while it is raining:

  • Plan in advance and choose the right and protected spot 
  • Look for dry tinder, kindling and firewood.
  • Get the fire off the wet ground.
  • Keep pumping oxygen  
  • Prevent the fire from going out 
  • Create a roof over the fire – i.e. use a tarp, but be careful with how tall the flames are and the distance from the tarp. 
  • Use a barn barrel to improve campfire endurance, as they will prevent water intake from the laterals. 

If you want to know more tips, you can read this article.

Can you cook under a camping tarp?

When camping in wet conditions, a camping tarp might be handy, and you can safely cook underneath it. 

However, the tarp must be set up correctly and ensure a safe distance between the tarp and the fire. If not set well, the heat, smoke, and sparks can damage or destroy the tarp. 

Moreover, the smoke can pose a safety risk to campers underneath it. If you want to build a fire beneath a tarp, ask yourself the following questions. 

How high should the tarp be over the fire?

There is no rule for how high a tarp should be over the fireOverall, a tarp height of 6.5ft (2m) off the ground allows enough space for campers to move underneath the tarp and offers ample gap between the flames, heat, and the tarp.

Be mindful that the type of wood you use might impact how high flames are – softwood, such as cider and pine, tends to produce higher flames. Hardwoods such as oak, hickory, and Fraxinus (aka ash) burn longer and produce lower flames and smoke. 

If you want to know what is the best wood for your campfire, read the following article – Which firewood is best for camping?

How to use a tarp over a fire?

The best tarp arrangement covering fire should be a sloped frame configuration (see photo below). 

This configuration allows smoke, and excess heat gets enough space to funnel out and away from underneath the tarp. 

Furthermore, the configuration allows rainwater to shed off the tarp, preventing the tarp from sagging. 

How much rain is too much for camping?

Withstanding wet conditions when camping is part of successful tent camping. However, not all wet conditions are suitable for camping. Sometimes the rain and winds become heavy such that you can’t cook under a tarp or outdoor. 

The rain levels above one inch per hour (25mm) are already considered heavy rain, and you might be at risk of floods and lightning. Always check the weather forecast before leaving home. 

As preventive measures, set your tent or fire on high ground so that you are naturally protected from unpredictable rainy conditions and use a waterproof tent. 

Conclusion

If you are ever facing heavy rain during your camping trips, don’t panic. This article detailed useful tips on how to cook while camping in the rain. 

Overall, bring adequate camping gear, including cooking equipment, accessories, and waterproof gear, and set your camping kitchen at the right spot. 

Have a safe camping trip!

What is the difference between tinder and kindling? (And how to use them)

Camping can be fun and adventurous, but you cannot make the most out of it without adequate preparation. You will have to ensure that you have all the materials to build a fire and stay safe in the wild. 

Many campers cannot correctly use the tinder and kindling since they find both the same. However, there will be a few differences, and you will have to be aware of them to make your camping safe and hassle-free. 

Overall, to start your campfire, you will need three different types of wood:

Tinder is easy to light and creates a short fire, enabling you to start your fire quickly. It is normally thin pieces of wood in a dry condition that facilitates easy combustion. 

Kindling is a similar material with a few differences, being slightly bigger. It can also help to start a fire, but its flames will last longer than tinder. 

 Firewood is normally used to keep your fire going for hours and allow cooking your meals – We will cover these materials in the following paragraphs and know the usage of each.

tinder vs kindling

What is tinder wood?

Among all the burning materials, tinder is the smallest. It can set a fire fast, and many campers prefer this material due to its easy-to-usage benefit.

The thinner is always better, and you will have to use pieces that are thinner than your little finger.

However, thin material cannot hold fire for long, and to keep the flames burning, you will need kindling and firewood. It uses small pieces of long sticks that you will find similar to the size from your wrist to the elbow.

What can be used as a tinder?

You can use any combustible material as the tinder wood, and you will have to focus on the size and length to avoid any confusion

Overall, we recommend it being thinner than the little finger of users, and the length needs to be a few inches. Another consideration is easy to light, and you will have to ensure that the material can start the fire directly, but you might not expect this benefit from kindling. 

You will experience difficulties while starting a fire if the material is moist due to water concentration. You can experience the same problem when the tinder wood is not thin.

Here are some materials you can use as the tinder wood during your camping. Moreover, they might be accessible near your camping ground, and you can collect and use them to start your fire. 

  • Twigs
  • Tree barks
  • Grass and dead leaves
  • Moss & straw
  • Wood shavings
  • Pine needles

There are also multiple industrialized options sold on Amazon these days, such as:

 If you cannot access all these natural materials, you can consider using other materials, including twine, wax, cloth, cotton, paper, fluff, and lint. These materials are highly combustible and can enable you to start your fire quickly.

Recommended ArticleHow hot is a campfire? 

What is kindling wood?

Kindling will also help to start fire and sustain the flame (as tinder will not last long), being slightly bigger than tinder

You can use this material to make your fire last slightly longer than flames from tinder, but not sufficient to last for hours. Both tinder and kindling will have many similarities with a few differences.

Whilst tinder is the smallest of all and firewood is the largest piece, kindling comes in the middle ground and can burn well and longer than tinder, holding the flame for longer. 

One of its main roles is to enable time enough time to get the firewood burning.

What wood is used for kindling?

You can use any material as kindling if it is combustible and dry

First, you will have to use tinder wood to light a fire, and then kindling will hold the flame and give time to the firewood to catch fire.

Kindling can be narrow and long of two feet, and you can use it as thin as the thumb. You can break a dry and long twig into small pieces and use them as kindling. 

The dry branches are the best since they can catch fire fast. When it comes to the material, you can consider the following: 

  • Cardboard
  • Dry branches and twigs
  • Dry and softwood

What is firewood?

Firewood is the largest wood piece that will keep your flames going longer. The wood logs can measure up to 16 inches, and they will be responsible for maintaining the fire going for hours.

To be considered a good fuel source, your wood will have to:

  • Be as thick as your wrist (around 15cm)
  • As long as an arm (around 30cm)
  • Around knee-high when stacked (about 50cm)

What is the best firewood for a campfire?

We have prepared a detailed article discussing this topic – read it here

To summarise, we recommend using hardwood varieties, such as ash, red oak and white oak, beech, birch, hickory, hard maple, pecan, and dogwood. 

All of them have high density, with significant heating output capacity. 

Small pieces of softwood will be suitable for kindling, give its ease of combustion and high flames. 

What is difference between Tinder and Kindling, then?

When it comes to differences, you will find differences in the level of combustion and size. 

Overall, tinder has easier combustion and is smaller, whereas kindling will take longer to burn and is slightly bigger.

Wood shavings and thinner twigs are tinder wood, and thick and long twigs are kindling. Besides, tinder material is fast and easy to light compared to kindling. Therefore, use them to start your fire quickly.

Kindling material will take more time to burn, but it will hold the flame longer. Even if the kindling is slightly damp, the material can catch fire when you have more tinder material. 

They will work as a “transition” between tinder and firewood, which will let your campfire be lit for a long period.

How to start a fire with tinder and kindling?

The first step will be starting your fire with tinder in a dry condition – make sure that fragments are small so that they can ignite fast. 

Keep adding more tinder to the flame and blow fresh against it (oxygen is essential for combustion).

When you start to see some consistency across the flames (they are continuously burning), it is time to start putting the kindling. Put it gently and in very small quantities since they will take longer to burn. 

You can extinguish your campfire if you throw too much kindling at once. When you notice that the new pieces of wood are burning consistently and fire is building up, it is time to add the dry firewood.

Similarly to the previous step, add in gently and in a “phased approach” (wood log by wood log). If you want to keep you fire going for hours, pay attention to the following tips:

  • Use dry firewood (with moisture levels less than 20% – use a wood moisture meter to check it)
  • Use hardwood instead of firewood. 
  • Use a few rocks in your campfire – rocks are excellent heat conductors and will make your campfire last longer.
  • Keep ventilation going (oxygen is essential for wood combustion)
  • Build a top-down campfire, with larger logs on the bottom base and smaller pieces on top. 

FAQ

What makes good tinder for a fire?

Even though there are multiple tinder options to start your fire, you must ensure that the chosen material is dry and highly combustible. 

It should be thin and small to allow fast-burning and flame spread. If you are already out on your camping trip, you can use these alternatives:

  • Dry leaves or grass (dead)
  • Pine needles or cones
  • Wood shavings
  • Twigs

If you have a budget and want to make your life easier, you can use some industrialized options (they cost less than $20):

What is the best kindling to start a campfire?

Since you want high flames with relative ease of combustion, the ideal kindling will be softwood that is cut into small and dry sticks to allow for easy and fast combustion

Some softwood options are: 

  • Cedar.
  • Douglas fir.
  • Pine.
  • Hemlock.

Softwood has a lower density, which produces less heating output with higher flames, and will burn shorter, being, therefore, ideal for kindling but not suitable for firewood. 

What size should a kindling wood be?

There is no rule here, but we highly recommend small logs with no more than 20cm in length and less than 5cm in diameter.

Ideally, you would have a mix of bigger and smaller pieces of kindling to facilitate ignition and burning. 

Conclusion

As detailed in this article, to make your life easier to start and keep a campfire going for long hours, you will need the following:

  • Tinder wood
  • Kindling
  • Firewood

Tinder will help you ignite the campfire and should be dry and cut into tiny pieces to facilitate combustion.

Kindling is slightly bigger and will help to spread the fire and keep the flame going so that you can throw big logs of firewood into your campfire. For kindling, we recommend you use softwood. 

Firewood is the most significant wood log that will allow for a slow burn and longer duration. If you plan to cook while camping, you should consider hardwood varieties, such as ash and oak, that can keep flames burning low and slow. 

Are tents waterproof? (And how to waterproof them!)

Well, this is an important question without a simple answer. Most manufacturers are unclear about their tent’s waterproofing, leaving an outdoor lover with many unanswered questions. They mainly focus on coatings and waterproof ratings, leaving out important information on waterproofing. 

So, are all tents waterproof? No, most tents are designed to be water-resistant rather than fully waterproof. An average tent can easily handle a typical rainstorm, but it may leak in heavy wind/rain. 

For your tent to be considered waterproof in most outdoor conditions, you will have to spend more to buy a tent with a 3000mm HH (Hydrostatic Head) rating – the HH is a measure that refers to how waterproof a fabric is (more on it below)

However, you probably don’t need to purchase an overly expensive tent to serve your purpose, as you might not need a completely waterproof tent. Most campers are lucky enough to find an affordable tent and use it with powerful waterproofing spray and seam sealant. 

 Keep reading to know more about how you can keep your tent waterproof. It is a long article, so feel free to read any section you want. 

are tents waterproof

How do you check if your tent is waterproof?

It is always good to know how much rain can your tent withstand.

Before you take your gear for your next camping trip, we recommend you do a dry run to check its waterproofness – After all, it is better to be disappointed in your backyard than in the wilderness. 

You have to inspect seams, walls, floor, and stitches. Even the tiniest tear or hole will allow rain to get into the tent, hence the need for a thorough inspection. 

Before you take your tent outdoors, pitch the tent, take the hosepipe out, soak the seams well, and examine the following parts of your new tent: 

#1 - Seams

Checking the seams is essential as they determine if your tent will last even a single night in the rain.

They are the most vulnerable parts of a tent because they can easily create holes and gaps, and must be completely sealed to make sure the tent is waterproof. There are different types of tent seams, including:

Taped Seams

This does not mean you take the tape into your house and put it on the seams – The tape would come off easily! 

Instead, manufacturers use pressure and heat to melt the tape into the fabrics. Taped seams are the best ways to ensure it is waterproof and will withstand rainy weather. Manufacturers tapes both interior and exterior seams for maximum protection against water. 

Welded Seams

Welded seams refer to when 2 pieces of fabric are welded together through pressure and heat- there are no stitching or holes in this procedure, providing excellent protection against water (as long as the weld stays intact). 

Most of the time, welded seams are commonly used to seal tent floors.

Inverted Seams

Inverted seams refer to when two fabric pieces are sewn together in the tent to ensure there are no gaps that may attract rainwater. They don’t come apart easily and are durable.

#2 - Sides

All tents have doors and windows, and if they are left open, they allow water to enter. Purchase a well-designed tent that will keep the rain away from the inside. 

Some tents, such as The Wenzel Klondike 8-Person, have screen room areas that allow better air circulation. However, you might want to close or retract this area to avoid water inflow during rainy days. 

#3 - Stitching

All tents are stitched, and every stitch is a small hole that should be examined carefully. Most tent designs overlap the material and reduce the amount of stitching to minimise the potential sources of leaks.

#4 - Hydrostatic Head

Hydrostatic (HH) measures the waterproof level of your tent’s fabric

This measure (also known as waterhead) is gauged in milimetres and refers to how high a column of water standing on the fabric would have to be before the water would pass through the fabric (and leak inside your tent, for example).

You may find highly water-resistant fabrics with a HH of 30,000mm, which means the water column would have to be 30 metres high before the water goes through the material!

Basic tents have from 1000mm to 2000mm HH rating, and they are suitable for use during light rain. However, if heavy downpour is forecast, you might have problems with them.


What is a Good Waterhead Rating for a Tent?

As discussed above, Waterhead and hydrostatic head mean the same thing. After our thorough research and own experience in camping, we noted the following guidelines:

  • From 0 to 1000mm – The tent is barely water-resistant and will only protect you from light rain for a short period of time (a couple of minutes.)
  • From 1000mm – to 2000mm – These tents are water-resistant, and you can enjoy some protection from wet weather (it will fit almost all camping conditions, and you should be fine). Ciays camping tent (below) fits up to 4 people and comes with a 1200mm waterhead rating at an affordable price. 
Ciays Camping Tent 2 Person Waterproof
  • Waterhead - 1200mm
  • Great Value For Money
  • Rainfly included
  • Lightweight
  • From 2000mm to 5000mm – These tents are highly water-resistant and will provide you with excellent protection against rainfall. A good example is Nature Hike Cloud up (below), which offers an impressive 4,000mm protection.
Naturehike Cloud-Up 2 Person Lightweight
  • Excellent waterproofness - 4000mm
  • Extremely High quality product
  • Quick and easy set up
  • Double Layer (Nylon-made)
  • From 5000mm and beyondThese can be considered waterproof tents. The fabrics can support a high load of rain without letting water pass through it – it might be your choice if you plan to camp in tropical climates or mountains, where rains are known to have high intensity and occur daily. 

Is a higher waterhead rating better for a tent?

Well, not necessarily. While the higher the hydrostatic head, the more water-resistant your gear will be, everything comes at a cost. 

Excess waterproof coating and protection may lead to a heavier tent and a decreased flexibility in your tent. This means that your gear will have less tear strength and can be easily damaged. 

Therefore, you need to find a sweet spot between water resistance and fabric strength. We would recommend tents from 1,000mm to 3,000mm unless you plan to camp in extremely wet conditions. 

To improve water protection, you can also use a rainfly, and you can also use waterproofing sprays.

How to waterproof a tent?

Waterproofing a tent is vital if you want to have a good camping trip to be enjoyable. Sometimes, the process is easier and cheap than investing in a new tent. 

First, you need to check for any issues with the tent thoroughly. Follow the following steps: 

  • Stake out the tent in a place with good ventilation and lighting 
  • Check if the rainfly has any holes. Even a 1mm tiny hole can make your tent wet in case of heavy rains.
  • Then, remove the rainfly to check the seams and walls. Look whether the seams are protected, and check for holes or peeling.
  • Examine the doors and zippers. Ensure there is no mesh exposed, and the zipper should be protected. 
  • Check for any coating that is peeling and any slits or holes. 
  • Lastly, double-check the seams inside the tent again to thoroughly look for holes in the floor.

If the waterproof coating starts to separate from the walls or floors, it would be good to purchase a new tent. If the tent doesn’t have severe problems, here is how you can waterproof your tent:

Step 1 - Sealing seams

To seal the seams, you will require a seam sealer, rags, and a small brush that comes with the sealer. Some options, such as the kit GEAR AID Seam Grip WP Waterproof Sealant already comes with everything that you need. 

Step 2 - Patching holes

If your tent has any holes, your tent will leak even when the rain is light. Patching holes involves the following steps: 

  1.   Clean the areas around the hole 
  2. Cut a precise repair tape; try rounding the edges so that it doesn’t peel off easily
  3. Tape it onto the tent, and you are done. 

There are multiple patching kits available these days. We recommend the TEAR-AID Fabric Repair Kit Gold Box since it’s compatible with almost all fabrics.

Step 3 - Spray the tent with durable repellant

The market has different water repellants for large or small tents.

 A repellant like Kiwi Camp Dry Water Repellant (below) is ideal if you want something protective and durable for your tent. However, it is still important to seal the seams and patch the holes separately because they are highly vulnerable spots. 

The video below further details how to waterproof your tent. 

Can a Tent lose its waterproofing?

Yes, it can, even though it is not so common. This is because the water-resistant coating applied to it might tear away with excessive sun exposure or inappropriate storage.

Therefore, it is important to check your tent’s waterproofness and re-coat it every one or two years or after every six months. This will strengthen the coating and prevent it from wearing.

How do I keep my tent dry in the rain?

Keeping your tent dry in the rain will provide many benefits. Keeping dry will keep you, and your gear protected so that you won’t have to purchase new ones now and then.

When camping in the rain, the interior should be well protected to enhance your comfort. The exterior already has power water-resistant properties that will prevent leakage. Here are important tips that will help your tent dry in the rain: 

  • Ensure the doors, windows, and ventilation points are closed.
  • Purchase a tent with a waterproof rain shield or rainfly 
  • Open windows when it is not raining, especially during the day. This will ensure the moisture released by breathing is not trapped inside (avoiding condensation)
  • Invest in a quality water repellant that will protect the tent’s surface 
  • Pitch your tent on high ground where water is running off
  • Get a seam sealant to get rid of weak spots that will let moisture in
  • Avoid setting up too close to streams and rivers. 

Conclusion

As you have seen, tents are actually more water-resistant than waterproof, and tent fabrics are classified according to the hydrostatic head.

Overall, tents with more than Waterhead ratings above 1,000m should be sufficient to protect you from light rain. If you are about to buy a new tent, always check for its waterproof rating and floors, seams and coatings.

Generally speaking, floors are areas that should have the highest protection, given they are constantly under pressure (your weight pressures the bottom of your tent against the soil and facilitates water penetration)

If you already have a tent, it might be good to undertake a wet test before heading on the next trip. Be mindful that water-resistant coats might tear away due to sun exposure and decrease their ability to retain water.

Therefore, ensure that your tent is re-waterproofed every now and then (6 months to 2 years) to ensure proper protection. You can use sprays, and seam sealers to help you on doing it.